2011. szeptember 26., hétfő

Those Stuccos.....

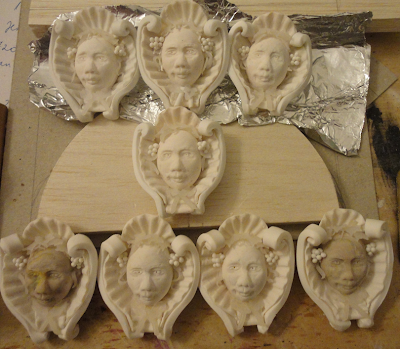
I spent the entire last week with making the stuccos and I'm really tired of it. I didn't want to make a mold, but I really didn't think it is so time consuming to make 8 stuccos.... Worst of it these are only the middle sections, more hard work will come, but now I have to concentrate another project: the 1st Wien Miniature Festival. I have to make some new items (some Halloween items and shabby chic furniture what I like so much). I will post them later, when it will be finished.
So, back to the stuccos: you can ask why 8? There is only 4 windows... Yes, on the front. But I decided to repeat the pattern on the back too. I can't just make a simple wall, the French architecture is far more sophisticated than that, so I wanted something extra. Here are some photos about them:

The window frames are almost completely ready 


Certainly this is not the final colour, I made them from clay and will paint it to limestone colour. 


I will be back soon with some Halloween and shabby chic item :)
Have a nice autumn,
Orsi


2011. szeptember 20., kedd

Harvest in the Orchard

Years ago I wrote an article into the AIM Magazine (Artisans in Miniatures). The topic was the harvest and it was about the orchard. I made this table to the article and filled it with food. The sturdy and ugly table serves well to the different dishes we prepare from apple and pear, such as apple pie, apple jam (yes, we prepared apple-pear jam in those years where we had only few apricots, as apricot produces well in every second year only), apple preserves, delicious pear-chocolate cake, which is very easy to make and you can serve it with clotted cream or ice cream or a mug of hot cocoa if the weather turns colder.


I spent almost 3 hours to look for a silicone mold to make dollheads to the stucco yesterday evening. Should I mention I didn't find it? But found this box, I made 3 years ago as a wall tackle study to my Inn to the Devoted Peasant Girl. You know by now what happened.... I spent the entire evening with painting and aging the outside of the box, look for some leftover aged timber from the Inn-project what I could use as timber here, collect some pottery, some of my leftover apples and pears, some old baskets I made and the new rusty bucket I bought in Paris. I found some eggs and eggshells too, the eggs are now in the hanging basket, the eggshells are in the rusty bucket, and I fine tuned the scene with some grapes and a carpet cleaner which was made by a friend of mine. 3,5 hours later the "Harvest scene" was born:


I don't know why, but I particularly like this darker one:


I brought it into my office this morning and when the weather is as cold and rainy as today I just have a look at it and it brings back happy childhood memories.

Finally here is the recipe of the chocolate-pear cake if you want to try. Everything is in metric:

Ingredients:
4 medium size, not too soft pears
2 tablespoons lemon juice
4 eggs (separate the egg yolks and whites)
pinch of salt
250 gr caster sugar (you can use demerara sugar too)
200 gr flour
1 tablespoons baking powder
3 tablespoons unsweetened cocoa powder
8 tablespoons water

Peel the pears, cut them into halves and remove their cores. Cut chunkier slices from them and leave them rest in a bowl of water (mix the lemon juice into the water to avoid the discoloring of the fruit)
Put the pinch of salt into the eggwhites and beat it well until it will be perfectly hard (when you turn your bowl upside down and the beaten eggwhites remain in the bowl, it is perfect)
Mix together the 4 egg yolks with the cocoa powder, sugar and water (use a wooden spoon). Add the baking powder to your flour and mix your flour into your cocoa mix. Take 1/3 of your beaten eggwhites and mix it thoroughly into your cocoa-flour mix. It will ruin the eggwhites, but this is the only way to get a fluffy cake as end result. Then very carefully mix the remaining 2/3 into your mix too. This time be gentle as we have to keep as much air in the eggwhites as we can.
Place baking paper (silicone paper is the best) into your baking pan (the side of the pan must be at least 4 cm high, the size is about 22-24 cm x 30 cm) and pour your cake mix into the baking pan. Arrange the slices of pear in it then put it into preheat oven (175 Celsius) and bake for 45 minutes.
The pears will be sweet and soft and the cake will be pretty moisture around the pears.
You can add chocolate pieces into your mix too.

Good appetite!

See you soon,
Orsi
2011. szeptember 19., hétfő

Facade Part 2.

This was a long weekend what I spent with hard work. The progress is very slow, as it takes quite a long time to cut the cardboard, saw and sand the wood and balsa. I was able to cut and glue all the cardboard "limestone" decor and wood+balsa+cardboard railing. Today I can start the stucco part with 4 women heads and tonnes of grapes and leaves.
Here are some photos about the current state:
1. How I put the cardboard to imitate limestone

2. All the "cardboard - limestones are glued to the front


3. Look into the future
(I'm quite impatient person and wanted to see how it will look like....)


4. One section of the front is painted with the first layer of gesso


5. Front without stucco


6. It will look something like this


See you soon,
Orsi


2011. szeptember 15., csütörtök

Facade

I partially finished the facade. Partially, because the worst part will come now: preparing the stucco decor and the four windows. I spent the last 10 days with building up the different layers of wood and cardboard onto the surface. The photo shows the bigger part (the front is divided into a smaller and a bigger part, as it is 78 cm long and it would be risky to open) with the balsa layers.

Probably now you think that the balsa is too soft to use in this kind of project and you are right. But this time I used a new solution called liquid wood. I used a Hungarian brand and it came out really  well. I applied it in two layers (0,2 mm thick/layer) which gave sturdiness to the balsa. With this product I could spare the several layers of gesso and was far more easier to sand than the gesso to get a smooth surface. But you must wear face mask and glasses during the sanding, as it has very fine powder.
I built up several layers of cardboard and wood but more to come before I will be able to move to the stuccos:


You see the marks and lines on this photo, where I will glue more cardboard decoration to simulate limestone.
Over all I'm so happy with the liquid wood that I will use it when I will need tackle, uneven wall in the future as without sanding it is perfect for this purpose too. It is definitely cheaper than gesso and thick enough to work with a painter's knife instead of brush.

See you soon,
Orsi

2011. szeptember 10., szombat

Christmas Carol

I reorganized my handmade related folders today and found the folder of this project I made two years ago as a gift. It is no more than a 3D box in a fake book cover. I gave it to a colleague of mine on the company's Xmas party, so the money I had to spend on it was limited. Therefore buying an old or antique book was out of question, so I bought a simple file folder we use in the office and created the fake cover.


The fabric was a simple marble patterned linen, for the spine I used cardboard stripes and leather. I had a terrible looking leftover bright yellow leather what I painted with wood stain (walnut and chestnut) and then varnished it unevenly to get this worn look.
I covered the inner side with an antique looking paper what I aged with some coffee:


As weight was a critical point, I covered the room with stained balsa wood. The armchair was made with the same method as the spine: I cut it from plywood, upholstered with leather and then aged it with varnish. It is a very easy method to create a worn and old looking leather item. Here are some close-ups:

Before varnishing:


After varnishing:


We talk about Scrooge, so the room is sparsely furnished, dark and cold:


Scrooge's dinner is porridge and sour rye bread with water. He doesn't finished the bookkeeping, the unfinished ledgers are still on the desk with a black quill and we see two candlesticks on the table too with some bottles of ink. The leaded glass window is covered with a pretty old lace curtain and an ugly brown curtain, to keep the cold outside.


I used real cobwebs in the corners and around the window:


As an extra gift I printed out a 100 year old Hungarian translation of the Christmas Carol, aged every single page with coffee (I used 90 gram/m2 paper and not completely blended nescafé, which gave better effect) I used a silk ribbon instead of traditional bookbinding and an old handmade lace to bind together the box and the printed book)

She was very happy with it and as she has two little sons, she has to open it every evening and show to her boys.

See you soon,
Orsi

2011. szeptember 6., kedd

Limestone Corridor

Finally I finished the limestone painting and moved on to the wallpaper doors. It took the whole weekend to finish the painting and the stairs which will lead to the roof.


3 "wallpaper" doors will be in the salon de thé, one will lead from the salon to the kitchen through the above mentioned limestone corridor and 2 will lead to the restrooms. Actually these are called "wallpaper doors" in Hungarian. These are the doors which look like the wall itself and can be recognized only when we are close enough. Certainly this is still unpainted. It will be simple white on the corridor's side and fancy on the salon's side.


I have a "wallpaper door" in my own apartment too, as the bathroom was created in the '70s and the door is not a regular one. Beside this there are two holes on the door as the heating system is installed in the bathroom (it uses gas, therefore the holes are mandatory). I painted the door like the wall itself (yes, it is painted, only the separating line was made of wallpaper border).


I hope you like it :)
Orsi